Collection: Learn How to Create the Ever-So-Trendy Heart-Shaped Tie Dye to Impress Your Friends
Be the envy of all your friends in a heart shape tie dye t-shirt! Get the step-by-step instructions to create your tie dye masterpiece.
Did you see a cool heart-shaped tie dye shirt while scrolling through social media? Now it's your turn to recreate this trendy style. Tie dye is more popular than ever, but instead of buying pre-made, commercial products, it's way more fun to make your own. And no, that heart (or any shape) isn't outside of your ability as long as you have the how-to instructions!
Although it looks impressive and complex, the heart is one of the easiest tie dye shapes to create. You only need a handful of supplies to get started. This tutorial will explain how to master heart tie dye patterns, step by step:
What you need:
- 100% cotton t-shirt (white works best!)
- Doodle Hog Tie Dye Kit of your choice. Our kits contain everything you need to create colorful designs, including dye, soda ash, gloves, and ties.
- Washable marker
- Disposable table covering or tarp
- Raised wire rack, such as a baker's cooling rack
Step 1: Fold Your Tee in Half

Fold your shirt in half lengthwise. Line up the sleeves to ensure the design lands in the center, and use your hands to smooth out any wrinkles. Flatten any noticeable bumps or bends in the fabric or on the work surface.
Step 2: Draw Half a Heart

Draw half a heart on the shirt, aligning the center with the fold. When you unfold the shirt later, you'll have a perfectly symmetrical heart! Use a light-colored marker for this step, but make sure it's washable. You can either choose to freehand the shape or trace a stencil.
Step 3: Fold and Secure

Fold the fabric in an accordion-like manner along the marker line so that the line appears straight. Keep the pleats as tight and small as possible for the best results. Hold the folds firmly between your fingertips, and secure the pattern with rubber bands.
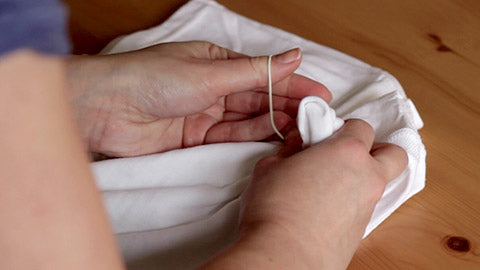
Continue adding more rubber bands down the length of your shirt, depending on how many colors you want to dye the shirt. You can dye each segment a different color!
Step 4: Apply the Dye

Ready to get messy? Put on the gloves, and place your banded shirt on top of the wire rack. Select the color you want to dye the heart, and apply the dye. Continue this step for each section, rotating the shirt to ensure complete color saturation.
Step 5: Wait, Wash, and Wear

Here comes the hard part—waiting for the color to set. After you finish applying the dye, you'll need to leave it alone for at least 12-24 hours. Cover your shirt in plastic wrap, and put it in a safe place. As the dye dries, it will permanently adhere to the fibers. Remove the rubber bands, and rinse out any excess pigment in warm water. After the shirt dries, it's time to put it on and show off your heart design!
Try These Pro Tips for All Your Tie Dye Designs
Want to tie dye like a pro? These insider tips and tricks will ensure every project comes out a masterpiece:
Pro Tip #1: Always Pretreat Your Fabric with Soda Ash
Before you begin the tie dye heart method, you'll want to soak your t-shirt in a soda ash solution for at least 30 minutes. Mix 1 cup of soda ash into 1 gallon of water, and fully emerge your shirt. After soaking your t-shirt, wring out any excess liquid, but don't rinse it.
What's the purpose of soda ash? The solution serves as a pretreatment to prepare the material for dyeing. Soda ash, also called sodium carbonate, helps the fibers better absorb the dye by increasing the pH level of the fabric. Science-y stuff aside, pretreating the material will give you brighter results.
Pro Tip #2: Use a Bleach Pen to Perfect the Design
Tie dye is somewhat unpredictable, but that's what makes it so special and unique. But stray dye can also distract from an otherwise perfect shape. After revealing your heart design, you may notice pigment outside the lines. It's easy to clean up the edges with a bleach pen. Simply run the pen over unwanted pigment, and watch the color vanish before your eyes.
Feeling an extra burst of creativity? Try drawing abstract shapes with the bleach pen to individualize your shirt even more!
Pro Tip #3: Apply Dye on Damp Fabrics
Working with dye can be finicky. It slips right off soaking wet material and doesn't evenly saturate dry fabric. Damp is the ideal compromise. That's another reason why soaking your item beforehand is best. After pre-washing your shirt, make sure to wring out all excess water. The fabric should be moist to the touch but not dripping wet.
Pro Tip #4: White Shirts Are Best
You can tie dye shirts of any shade, but if you want vibrant, true-to-color results, it's best to stick with white. Trying to dye anything too dark, like black, dark gray, or navy, may look muddy or not show up at all. Lighter hues and pastels can work, but the dye will appear differently than it looks in the bottle. If you try something other than white, you may want to swatch the dye in an inconspicuous place to see how it transfers. But if bold colors are your preference, pick up a white shirt.
Pro Tip #5: Prepare to Get Messy
Tie dyeing gets messy—there's no way around it. Dye has a funny way of splattering all over the place, but it's possible to minimize the mess. First, always wear clothes you don't mind ruining. Now is not the time to pull out a brand-new white button-down. Instead, toss on a painter's smock or hand-me-down t-shirt.
Cover the entire workspace with a waterproof, disposable tarp or covering. The more surface area you protect, the less you'll have to clean up later. Place a drip pan under the wire rack to catch excess dye, and wear gloves to keep from staining your hands.
Tie dyeing with kids is loads of fun and something we highly recommend. But you may want to move the festivities outdoors to avoid dye on interiors walls, window coverings, or carpet. Besides, fresh air and sunlight make tie dye even more exciting!
How Do You Tie Dye a Heart Shape on Other Items?
While most people envision t-shirts, you can tie dye heart images on just about anything! To accomplish this, follow the same steps listed above, but replace the shirt with your desired item. Depending on the thickness of the fabric, you may need to let the dye set longer.
Tie dye works best on natural fibers. Cotton, linen, and denim are some of the most popular options. Here's a small sample of other fun items to tie dye with hearts:
- Socks
- Beanies
- Sweatshirts
- Jeans
- Canvas shoes
- Hoodies
- Joggers
- Tights
- Blankets
- Towels
- Tablecloths
With so many options, why does everyone seem to tie dye t-shirts? Shirts are the most popular because everyone wears them, and plain t-shirts are relatively inexpensive to buy. Plus, you won't shed any tears if you experience a dye catastrophe on a cheap shirt. That's why we recommend testing your skills with items you don't care about before you dive into expensive textiles.
Are there any items you should avoid? Fabric dyes aren't ideal for synthetic fibers. Man-made materials, like polyester, acrylic, and nylon, don't absorb pigments very well. Even if the dye does transfer initially, you may experience color bleeding and fading.
How Do You Make Tie Dye Shapes Besides Hearts?
Not feeling the heart design? No problem! You can tie dye all sorts of shapes and patterns, and once you master one, you'll better understand how to create others. Here are some of the most popular tie dye shapes:
- Spirals
- Triangles
- Squares
- Bulls-eyes
- Stripes
- Polka dots
- Circles
Now it's time to learn how to tie dye shapes into shirts. These designs follow the same basic steps, but they each have their own twists to create a unique shape. Here are the surprisingly easy instructions to tie dye a spiral:
- Lay the shirt flat, and smooth out any noticeable wrinkles.
- Find the center of the shirt, and pinch the material between your fingers. Begin twisting the fabric into a tight circle and continue until the entire shirt forms a spiral. Secure the spiral with several rubber bands.
- Place the shirt on a wire rack, and apply the dye.
That's it! Once you let the pattern dry, rinse out any residual dye to reveal the tie dye spiral. Now that you know how to tie dye shapes onto shirts, you can follow similar steps to create any desired pattern. The sky’s the limit when it comes to tie dye. Let your imagination run wild!
How Do You Make Vibrant Tie Dye?
Bright, vibrant colors are what make tie dye stand out from other techniques. But how do you make those colors really pop? It may come as a surprise, but the secret lies in a chemical compound called sodium carbonate, known in the crafting world as soda ash.
A soda ash soak should always be the first step of any tie dye project. As stated earlier, it raises the pH of the fabric, which activates the cellulose in the fiber to make the dye stick. Pretty cool, huh?
But don't confuse soda ash (sodium carbonate) with baking soda (sodium bicarbonate). Soda ash (Na2CO3) contains two sodium atoms, one carbon atom, and three oxygen atoms. Baking soda (NaHCO3) has one sodium atom, one hydrogen atom, one carbon atom, and three oxygen atoms. What does this mean? Baking soda lowers pH levels, which makes it harder for the dye to adhere. While you may get some transfer, baking soda will produce duller colors.
Increasing the curing time will also produce more vibrant colors. The longer the dye sits on the fabric, the more time it has to adhere to the individual fibers. While rinsing the dye too early may cause bleeding, there's no harm in letting the item sit for an extended period. Many crafting pros let their creations cure for 1-2 days.
After rinsing excess pigment from your heart tie dye sweatshirt, washing it in hot water will help set the dye even more. There is still a slight chance that some dye may leak into the water, so only wash your shirt with like-colors or alone. Subsequent washings should be in cool water to prevent the colors from fading over time.
Unsure where to buy soda ash? Luckily for you, all the tie dye kits from Doodle Hog contain enough soda ash to pre-soak your items. That's why our customers enjoy such bright, vibrant results!
How Do You Reverse Tie Dye a Shirt?
Reverse tie dye is a unique method that lets you remove color to form patterns and shapes. It works best on dark hues, especially black, but it can work on any color. How do you remove color? Bleach.
Reverse tie dye follows the same steps as traditional tie dye, but you replace the fabric dye with bleach. Pure bleach oxidizes fibers and lifts color.
If you want to try your hand at the reverse tie dye method, you'll need a dark shirt, bleach, a bowl, and gloves. Since bleach is toxic, you should consider wearing protective goggles and a mask. Choose a pattern or shape for your item—a heart tie dye is perfect! Follow the steps to fold and gather the material, and then bind everything in place.
Here's where things get different. Instead of applying color, you're going to remove it. Submerge your item in a bleach solution of 1 part bleach to 1 part water. Let it sit for 15-30 minutes, checking on the progress regularly. You don't want to leave your shirt in the solution for too long, however. The bleach can damage the fabric.
It's important to note that color-safe bleach doesn't contain the same chemicals as regular bleach and won't remove the color. Pure bleach contains sodium hypochlorite, and color-safe bleach contains hydrogen peroxide. And yes, hydrogen peroxide can lighten your hair or skin, but hydrogen peroxide doesn't affect fabric dyes.
What color will the reverse tie dye method turn your shirt? No one knows! Dark colors will turn various hues as the bleach works its magic, and the color-changing results are often unexpected. Some black fabrics even create a rainbow effect!
How Do You Tie Dye a Heart with Bleach?
As it turns out, playing with bleach can result in some really cool tie dye patterns and colors. (But remember to play safely!) As you probably already figured out, it's possible to tie dye a heart with bleach. Here's how:
- Fold your shirt vertically.
- Draw half a heart along the folded side.
- Fold the shirt along the line and bind it together.
- Immerse your shirt in a bowl of bleach and water for 15-30 minutes.
- Remove the shirt, rinse out excess bleach, and machine wash alone on the regular cycle.
These steps follow the standard heart design exactly until you add the bleach. And this method will create a bleached tie dye effect on the entire item. To create a clear separation between the heart and the rest of the shirt, try using thicker rubber bands.
What if you only want to bleach the heart? You don't have to submerge the entire shirt into the bleach. It's possible to target only the heart design with a bleach pen or spray bottle.
Ready to Test Your Craftiness with a Heart Tie Dye?
Looking for a family-friendly crafting activity? Consider tie dye! Although this art form rose to fame in the 1960s, it's making huge waves today. It's one of the most popular fashion and home decor trends out there. And anyone can create their own one-of-a-kind, totally unique tie dye pieces.
The heart tie dye remains one of the most sought-after designs. And while it may look tricky from a distance, it's effortless to master. Follow these instructions, and we're confident you'll create a beautiful heart on your first try!
Doodle Hog makes it easy to get creative at home. We offer complete tie dye kits in a range of colors. Whether you want bold shade or subtle hues, you'll find everything you need right here. Our products let you explore your artistic side, and we want to empower you to express yourself through art.
We welcome you to explore our range of creative products, and learn how to create a heart-shaped tie dye shirt for yourself. If you post your masterpieces on social media, be sure to hashtag #doodlehog!
♥ The Doodle Hog Team